News & Features
This page includes news and articles on getting the best from your allotment plus a selection of recipes to help you enjoy your harvest. If you are a RT&DGS plotholder and would like to contribute a news item, article, tip or recipe, then please get in touch using the contact form.
News
The potato and seed orders have arrived and the shop will re-open on 8th February from 10 am
The Shop
The shop is currently open every Saturday and Sunday from 10am to 11am, except in December & January.
If you are a plotholder on either the Fairfax or Stourbridge site and you're interested in volunteering to help in the shop then please get in touch using our contact form.
The shop is currently open every Saturday and Sunday from 10am to 11am, except in December & January.
If you are a plotholder on either the Fairfax or Stourbridge site and you're interested in volunteering to help in the shop then please get in touch using our contact form.
Composting on your Allotment
Twenty or thirty years ago it would have been unthinkable for an allotment not to have a compost bin or a heap of some kind. Why then do only half of our society’s tenants have their own compost bin?
The soil on your allotment is your biggest asset. It’s full of precious nutrients and it’s up to you to make the best of it. Anything that grows on your plot (weeds included) takes nutrients from your soil which need to be replaced if you want to get the best from your next harvest. Composting is easy, cheap and actually saves you the effort of taking your green waste away. There are two basic ways to compost: hot or cold. Hot composting is better suited to composting at home, so we’ll just cover cold composting here.
The first step is buying or making a compost bin. If you’re buying, the cheapest type is the Compost Convertor or “Dalek”. This is cheap (£20 - £30) and mobile and will last for 5 years or so. Compost aficionados can have as many as three per half-plot and move them around every year, but one is a good start. Another option is the Komp Bin, which is more expensive (from £40), more robust and slightly bigger – designed for more a permanent position. If you have £130 to spare you may consider a beehive type compost bin. It won’t make better compost than the other types but you’ll have the best looking compost bin in Romsey. You may also see things on the market with names like GREEN JOHANNA, BOKASHI and GREEN CONE, these are for hot composting and are prohibitively expensive.
If you choose to make your own compost bin, there’s no prescribed size or shape and it needn’t cost you anything. Just use what you find lying around. Four or more fork-lift truck pallets will make you a very good compost bin. You can drive posts into the ground and drop the pallets over them or use wire or cable ties to fasten them together. Ask at shops like Mackays, Ridgeons or Topps Tiles for pallets. They’re usually glad to get rid of them. You can use old doors, fence panels, concrete slabs (an old coal bunker is ideal), corrugated iron or even wire mesh lined with cardboard. Just build your bin straight onto the soil (no wooden or concrete floor) to allow the soil organisms to do their work.
You can start loading your bin straight away with almost any plant material (notable exceptions would be couch grass and bindweed), cabbage stalks (chop them up and they’ll rot as quickly as most other things), any rotten fruit that isn’t diseased, substandard potatoes (squashed) and tomatoes (you may get unwanted tomato plants but they’re easy enough to handle), vegetable peelings, fruit skins, tea bags, eggshells & coffee grounds, wood ash and barbecue ash from lump-wood charcoal (the briquettes contain petrochemicals and shouldn’t be composted), grass cuttings and grass roots, any woody stuff including hedge clippings and raspberry canes (chopped as small as possible), soil, clay (it’s rich in nutrients and is brilliant when mixed with other stuff, just make sure the clods aren’t too big), paper & cardboard, dead flowers, dead pot plants (unless they died suspiciously) and spent potting compost. If you have a lot of fallen leaves, compost them separately in a black bag for a year or so before adding them to your heap. You can even compost most weeds: Drown them in a bucket of water for a week or so, then add them to your bin. They’ve stolen your nutrients so make them pay! Or what about snails and slugs? A lot of people haven’t the heart to kill them outright but if you pick them off your crops and put them in your compost bin, they’ll die fat and happy while helping to digest your unwanted greens.
Things to avoid in your compost include any plants you suspect are diseased or blighted (but these are safe to put in your council green bin), large bits of tree (they will rot down eventually but you may be very old by then), cooked meat & fish, dairy products, and fats (you’re unlikely to have any of these on your allotment and they may attract vermin), anything with a high dose of chemicals (including treated wood), but most common horticultural chemicals will be broken down into harmless components by the bugs.
Strike a balance of greens and browns to get good compost , but don’t be fooled by the colours. Greens are quick to rot, and have a high moisture and nitrogen content. These include vegetables, fruit, grass cuttings, tea and coffee. Browns are slower to rot, and have high a fibre and carbon content. These include woody stuff, leaf mould, paper & cardboard.
If there’s warmth, air and moisture the bugs and wrigglers will do the rest. You can see some of these like worms, woodlice, slugs, snails, beetles, centipedes, and earwigs. Others you can’t see, like bacteria, fungi and amoeba, but they’re just as important.
If your compost isn’t composting you could try turning it over. It can be quite laborious but it really speeds up the process. Or you could add something to get it going such as grass cuttings, nettles or comfrey. They rot like crazy and give a real boost to everything else. Urine is also a great compost accelerator. Apparently a good ratio is 1:20 which is roughly one wee in a bucket of water! How you do it is up to you, within the bounds of common decency.
Your compost will probably be ready in about a year, but it could be sooner. Look at the bottom of the heap. The compost should be dark brown and quite fine. If there are still a lot of wrigglers in it, it probably needs a bit longer. When it’s ready, just dig out the compost from the bottom and leave the top layers to carry on digesting. The compost should then be spread over your soil just after you’ve harvested something before you turn it over. With the “dalek” type of composter, the door in the front is purely there as an inspection-hatch. When you think the compost is ready, just wiggle the whole bin until you can lift it off the compost cake. Any undigested stuff will be the starter for your next batch.
Common problems include smells, flies, ants or vermin. A smelly compost heap probably means it’s too wet and has too much green stuff. Put on a layer of torn cardboard and mix up the top layers. If it’s still smelly after a couple of days you can add a layer of soil. Lots of flies are probably caused by lots of fruit. Leave the lid off and they’ll probably stop breeding, if not, add a layer of soil. If ants are nesting in your heap, it means that it’s too dry. DON’T add ant powder. Wet your heap and add as much green stuff as you can. Rats or mice are unlikely on an allotment heap, but will be attracted by raw or cooked meat. Bang your heap daily and disturb it as much as possible and they’ll probably move on. Very fine mesh on the bottom is a more permanent preventative. Not a problem on Fairfax as the fox keeps them at bay.
To sum up: Choose what type of bin you want and either buy or make it. Start filling it immediately with a balance of greens and browns. If it fills up too quickly, consider getting a second one. Turn it over if you can and then reap the rewards.
Find out more about composting including special offers on compost bins online at http://www.recyclenow.com/reduce/home-composting or by phoning 0845 600 0323.
Water Conservation
The allotment sites are well supplied with water troughs for filling watering cans. This is metered mains water which is paid for out of membership fees. There are plenty of things you can do to conserve water which keep these costs down, reduce the strain on this precious resource, and save on trips to the trough.
Simple things can make a big difference, like watering plants before removing them from the pot when planting out.
Soil is better at retaining water when it contains plenty of organic material, so regular composting is ideal for keeping your plot fertile and moist. You can also lock water in the ground by adding a top layer of mulch which could be compost, bark or grass cuttings. You can also use a layer of plastic or fabric, which you can buy in the allotment shop.
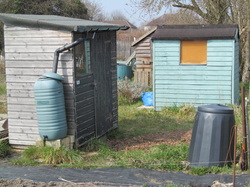
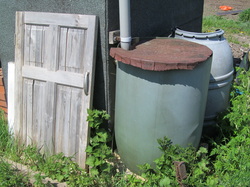
If you have a shed it makes sense to install water butt. Water companies often have special offers to supply reduced price butts, but you can also recycle suitable containers like dustbins. Most hardware stores have appropriate taps, or you can simply take water from the top of the container. However, please make sure the top of butt has a sturdy lid to stop cats and other small animals falling in.
There are also groundwater pumps located throughout the site. Most are in working order but need priming before use.
Finally if you see evidence of a leak in the water system, please notify a member of the committee (or use the contact form) to help prevent your membership fees from going down the drain.
The allotment sites are well supplied with water troughs for filling watering cans. This is metered mains water which is paid for out of membership fees. There are plenty of things you can do to conserve water which keep these costs down, reduce the strain on this precious resource, and save on trips to the trough.
Simple things can make a big difference, like watering plants before removing them from the pot when planting out.
Soil is better at retaining water when it contains plenty of organic material, so regular composting is ideal for keeping your plot fertile and moist. You can also lock water in the ground by adding a top layer of mulch which could be compost, bark or grass cuttings. You can also use a layer of plastic or fabric, which you can buy in the allotment shop.
If you have a shed it makes sense to install water butt. Water companies often have special offers to supply reduced price butts, but you can also recycle suitable containers like dustbins. Most hardware stores have appropriate taps, or you can simply take water from the top of the container. However, please make sure the top of butt has a sturdy lid to stop cats and other small animals falling in.
There are also groundwater pumps located throughout the site. Most are in working order but need priming before use.
Finally if you see evidence of a leak in the water system, please notify a member of the committee (or use the contact form) to help prevent your membership fees from going down the drain.
Recipes
|
Chocolate and beetroot muffins
If you are lucky, your spring-planted beetroot will be ready to harvest in July. Don’t forget that the gently boiled leaves make a tasty alternative to spinach, and why not use some of the roots to make a desert? Beetroot adds depth to dark chocolate flavours. It also holds the moisture in cakes and buns and, of course, gives them a deep red hue. Here’s a simple recipe for cupcakes or muffins that uses sunflower oil instead of butter and might even be relatively healthy. Ingredients 200g (7oz) self raising flour, 60g (2oz) cocoa OR 100g (3.5oz) grated plain chocolate, 250g (9oz) caster sugar. Use golden sugar for a richer flavour. Use only 210g (7.5oz) with grated chocolate, 210ml (7.5fl oz) sunflower oil. 3 large eggs, 300g (10.5oz) cooked beetroot, grated or pureed, Additional flavourings to taste. These can include a teaspoon of vanilla essence, a half teaspoon of cinnamon, or (for the adventurous) a small amount of finely chopped chilli. Method Pre-heat the oven to 190°C/375F/Gas mark 5. Sift the flour, cocoa and flavourings into a bowl. Add the sugar and chocolate. Stir well. Add the eggs and beetroot, and blend or mix all of the ingredients together. Gradually add the oil and continue blending/mixing to achieve a consistent mixture. Cook in cupcake cases or a muffin tray, on the top shelf of the oven, for about 20 minutes, until they pass the skewer test (a skewer or cocktail stick stuck into the bun comes out clean). Leave in the tray for 10 minutes to cool. These moist confections can be served as they are, with crème fraîche, or with a topping of butter icing which can be coloured red with beetroot (or a teaspoon of the water in which they were cooked). |
Squash and Feta Crumble
Here’s a wholesome main course to enjoy during the cooler months. This is slightly fancier variation on the tried and tested approach of placing chunks of squash and chopped onions and a little oil in a roasting tin, covering with crumbled feta cheese and oats (and Worcester sauce to taste) and roasting until the vegetables are tender. You will need A suitable large squash (butternut, winter, harlequin, even pumpkin or marrow), peeled, seeds removed and flesh cut into large chunks (1 inch is a good size). 2 large onions, chopped, and plenty of crushed garlic. 200g of feta cheese. Olive oil and seasonings. 150g of butter. 100g of plain flour. 100g of oats. Method Put the squash, onions, and garlic into a roasting tin with a little olive oil and seasonings of your choice. Salt and black pepper work well, as does Worcester Sauce, basil or oregano. If you’re not quite ready to give up on sweetness, you can also add a half tablespoon of your favourite brown sugar. Cover with foil and cook at gas mark 7 (210°C) for 20 mins and then remove from the oven. Now you have a choice of the lazy route or the gourmet route. If you want the gourmet version, then read on, otherwise skip to the next paragraph. Transfer the squash to a cast iron vessel (a gratin dish) and keep the onions in the roasting tin. Place the roasting tin on the hob on a medium heat and gently stir the onions until caramelised. Add the caramelised onions to the squash. You can mix the vegetables together or keep them in separate layers for a different effect. Make crumble out of the butter, flour and oats by rubbing them together until you have an even crumb with no lumps. Add further seasoning to the crumble if required. Crumble the feta cheese over the vegetables (in a gratin tin for the gourmets or still in the roasting tin for lesser mortals). Bake at gas mark 4 (180°C) until the crumble is golden. This is a filling mixture of vegetables, carbohydrates, fats and proteins which can be eaten on its own or with a salad or green vegetables. This recipe was adapted from www.alice.is, which contains lots of other tasty suggestions for your veg. |